Bspwm Basics
Automation and workflow feat. BSPWM.

Introduction
BSPWM is a neat window manager with some neat features. In this article we will be briefly looking at how BSPWM functions and what some of its features are.
Maybe analyze a bit of its source code, IPC commands and some other possible extensions.
Before We Begin
This is a fairly intermediate article which may seem easy to follow at first but, will get relatively difficult to follow as it progresses further. You would need to have the following things to progress smoothly.
- Maybe a tiny amount of BST data structure.
- Experience with window managers and X11.
- Programming experience is preferred.
All right! Let us begin.
About BSPWM
BSPWM is a tiling window manager that represents windows as the leaves of a full binary tree. It uses an IPC application that invokes X events and changes BSPWM' internal states.
Unlike most other window managers it does not have a dedicated configuration file.
You use the IPC client (bspc) for everything. Be it setting window gaps, border
colors, layouts, monitors, etc. For BSPWM a configuration file is just a shell
script that needs to be stored in $HOME/.config/bspwm/bspwmrc. It is a shell
script that should have commands that starts a keyboard daemon, notification daemon,
monitor configurations, border, gaps and other stuff as bspc calls. You may also
have commands that will start some startup applications like discord, bars, etc.
This is preferred because when BSPWM is first launched, it does not have any
state at all. You need to execute some bspc commands which will set an initial
state then you would be able to spawn windows and whatnot.
Display Structure
It should be noted that BSPWM is a window manager, which means it manages windows. And it does so by representing the window tree as leaves of a full BST.
For application windows to be able to spawn, BSPWM first needs to define a root window. Which in WM lingo is called a workspace. And, after said workspace(s) are defined, one can now finally open an application window which will be managed by BSPWM.
Add on top of this information it is to be noted that BSPWM was originally designed for a computer with only one monitor. If you are curious then yes, the author has already added multi-monitor support. Monitors are also treated the same as roots i.e. a list.
If you are still confused then the following illustration will help ease that.

In this construct, the monitors stay at the topmost level. These monitors are the parents of workspaces.
Monitors
If we analyze the source then we will see that monitors are not represented as a multi-branched tree rather, as a single-branched one i.e. a linked list. Where the current monitor has links to the previous and next monitors.
288typedef struct monitor_t monitor_t;
289struct monitor_t {
290    char name[SMALEN];
291    uint32_t id;
292    xcb_randr_output_t randr_id;
293    xcb_window_t root;
294    bool wired;
295    padding_t padding;
296    unsigned int sticky_count;
297    int window_gap;
298    unsigned int border_width;
299    xcb_rectangle_t rectangle;
300    desktop_t *desk;
301    desktop_t *desk_head;
302    desktop_t *desk_tail;
303    monitor_t *prev;
304    monitor_t *next;
305};See those prev and next variables? Here the prev variable points
to the previous monitor_t structure and next, next. And, if either of those
pointer variables has NULL then it is to be assumed that the focused
monitor is either at the end or at the beginning of the monitor list.
Workspaces
For desktops, the structure is pretty much the same as monitors. That is, both desktops and monitors are represented as doubly linked lists with links to previous and next desktops.
Workspaces are called desktops in BSPWM. They are used interchangeably. You will see both of them appear in this article.
See the following code snippet.
273typedef struct desktop_t desktop_t;
274struct desktop_t {
275 char name[SMALEN];
276 uint32_t id;
277 layout_t layout;
278 layout_t user_layout;
279 node_t *root;
280 node_t *focus;
281 desktop_t *prev;
282 desktop_t *next;
283 padding_t padding;
284 int window_gap;
285 unsigned int border_width;
286};Monitor-Workspace Relation
The following figure attempts to briefly define the monitor-workspace
relation in BSPWM that takes the above monitor_t and desktop_t
definitions into account.

The first monitor (marked in green) has three desktops where the label
of the first desktop is identified by (+), second by (-) and lastly
third by (=).
It should be worth noting that having duplicate labels are possible
because the window manager does not identify workspaces from labels
rather they use the ID of that desktop/workspace. You can check what
the current IDs with a simple query to BSPWM via the bspc IPC client.
The BST data structure
The Binary Tree data structure is a way of representing data in the form of a tree. A BST is a special case of a tree that only has two children. As with all trees (both natural and pragmatic), this one also has leaves and branches. The leaves are called nodes which is the term we will use from now on.

You may also notice that the nodes are colored differently. The colors signify levels. For instance, the root level node is colored with green . The second level nodes are colored with blue and lastly the third level nodes are colored with red .
A BST node would look like the following in C.
This node will contain a pointer to the left child and another to the right child.
Left and right child are siblings as illustrated in the diagram. And,
some_data which is the data that the node will be carrying.
Now, consider the following code to get a clearer visualization of how the node
is being initialized and how some basic components work.
Minimal BST implementation in C
1
2
3
4
5
6
7
8
9
10
11
12
13
14
15
16
17
18
19
20
21
22
23
24
25
26
27
28
29
30
31
32
33
34
35
36
37
38
39
40
41
42
typedef struct node_t node_t;
struct node_t {
    int data;
    node_t* left;
    node_t* right;
};

int
main(void) {
    node_t root;
    node_t left;
    node_t left_left;
    node_t left_right;
    node_t right;

    root.data       = 10;
    left.data       = 11;
    left_left.data  = 124;
    left_right.data = 89;
    right.data      = 19;

    root.right = &right;
    root.left  = &left;
    left.left  = &left_left;
    left.right = &left_right;

    printf("   %d\n"
           "    |\n"
           "   / \\\n"
           "  %d  %d\n"
           "   |\n"
           "  / \\\n"
           "%d  %d\n",
           root.data,
           root.left->data,
           root.right->data,
           root.left->left->data,
           root.left->right->data);
    return 0;
}

// vim:filetype=c
The above code is a recreation of the binary tree diagram that you came across in the beginning. Play with it to get a feel for BSTs.
Similarly, BSPWM interprets a window as a node and then maps them into a tree. Now, following is a part of BSPWM source code that defines a tree node. Seems quite intuitive and easy to understand right?
| |
This is just a guess but the reason the author calls left_child and
right_child, first_child and second_child is due to how the windows
(nodes) are spawned. That is, the first window is spawned which
is by name, the firstborn of the current parent and the second
child is the second-born of the parent. It is done to guide intuition
when reading the code.
Automatic Mode
This is a bit tricky to explain. So, we must tread carefully in order to avoid making things confusing.
Previously, we saw that BSPWM represents monitors and desktops as a doubly linked list. Windows are represented as leaves of a full binary tree. Opening a new window in BSPWM is called an “insertion” where the window is a node that is to be inserted to a point on a binary tree as a child of a parent.
Now, insertion has two modes in BSPWM, automatic and manual. The automatic mode consists of several types or, rather the ways, patterns of how a node/window should be tiled. Such ways are called schemes and there are three such schemes.
- Alternate scheme
- Longest-side scheme
- Spiral scheme
You can change the automatic scheme by issuing a bspc call as the
following.
Now, in my opinion understanding the alternate (default) scheme would be the quickest way for a confused beginner to grasp the general workings of BSPWM. So, I will attempt to explain that first.
Alternate Scheme
I will be explaining this with an example where new windows will be opened step by step and in those steps it will be explained how BSPWM arranges those windows. I will be aliasing these steps by zero, initial, first, second, … and last.
Null State

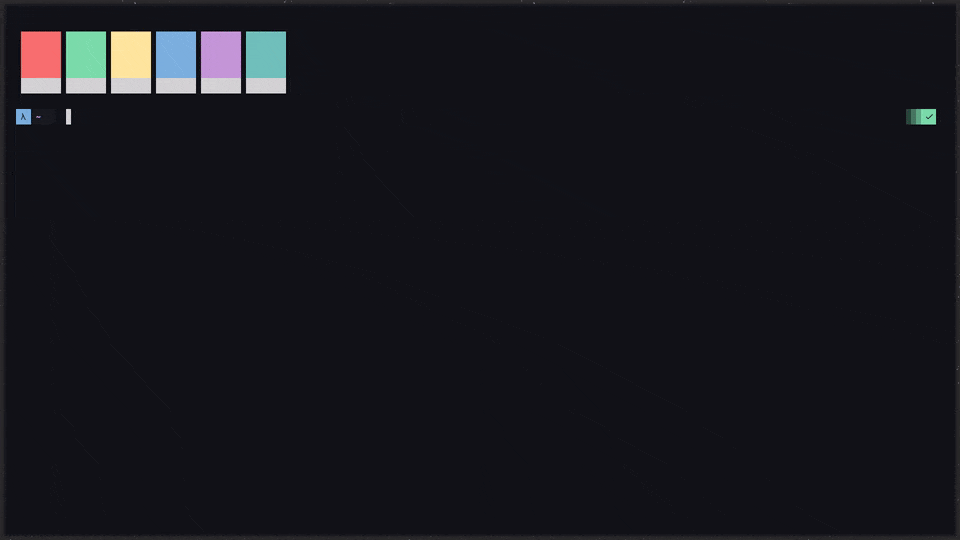
Well, that is just my wallpaper 😢. Anyway, this is a state where windows are yet to be spawned. It is just an empty desktop at the moment.
Initial State

Here, we have just spawned a terminal window. Now, the desktop is at an initial state. Where a new window/node has been inserted.
Second State

Following is a simplified code snippet of the second state.
The above snippet checks if the new_node that is to be inserted is
the first child of the parent node or, not and if it is then the
second node attribute of the parent node will be pointing to the
new_node.
Now, the first_child has a sibling i.e. the second_child. They are
brothers. By using bspc you can verify if they are truly brothers
or, not. Try issuing the following command. You can be focused
in either the left or, the right window.
For verification, you first need to obtain the window IDs of
those two windows. Let’s say right one is 0x3000006 and
left 0x2600006 in my case. You can see the above picture with
two windows open as a reference.
Anyway, I’ll focus on the window with ID 0x3000006 (right) and
type the following command. We will be now check if typing
that results in the opposite window’s ID (left).
As, you can see it gives out the window ID of the window on the left.
Additionally, close the window on the left and type that same command
into the terminal. You will see STDERR is being returned instead as
now the first_child has been assigned the NULL pointer.
Type the following command for verification. It will catch that
STDERR and convert it to a falseish value or, trueish if not STDERR.
The command will print NO if the bspc call results in STDERR,
YES otherwise.
Third State

This is probably a good time to mention what nodes A and B
mean. Currently, node A is the parent of nodes B and 1 and node B
is the parent of nodes 2 and 3.
They are called parent nodes or, as BSPWM defines it, internal nodes.
They will only appear when a second_child is about to be born. So,
for example going back to the second state
we need to understand that parent A will not appear until it is time
for a second child 2 to be born. So, in this case, before the second
child is born the first child is shifted to the left of a new node and
the second child is attached to the right of that new node. And, that new
node now becomes the parent of those two nodes. Additionally, keep in
mind that internal nodes are not visible. When a node gets divided
in two an internal node gets created and stays below the first_child
and second_child.
In automatic modes the direction in which the windows will be fragmented
is called the initial polarity. And, by default, that polarity is set
to the second_child (here second_child means the right side of the parent).
That is why you see 1 shifted to the left and 2 to the right.
And, similarly, 2 gets assigned to the left and 3 to the right.
This initial polarity can be changed by issuing the following command.
Moving forward, we now need to confirm a few things to make things a bit clearer. For starters move to an empty desktop/workspace and open a window and see if the window has any parents or, not. Do this by issuing the following command.
Printing YES means that the command returns STDERR which means
that the terminal window that you are typing in has no parent.
Similarly, open another window and you will see that the command
now returning NO which means that the first terminal window
and the second one now have a common parent and that they are
brothers.
In the above command 0x004000AB is the window ID of the parent.
Now, close everything in that desktop and open two new terminal windows.
Obtain their window IDs using xwininfo.
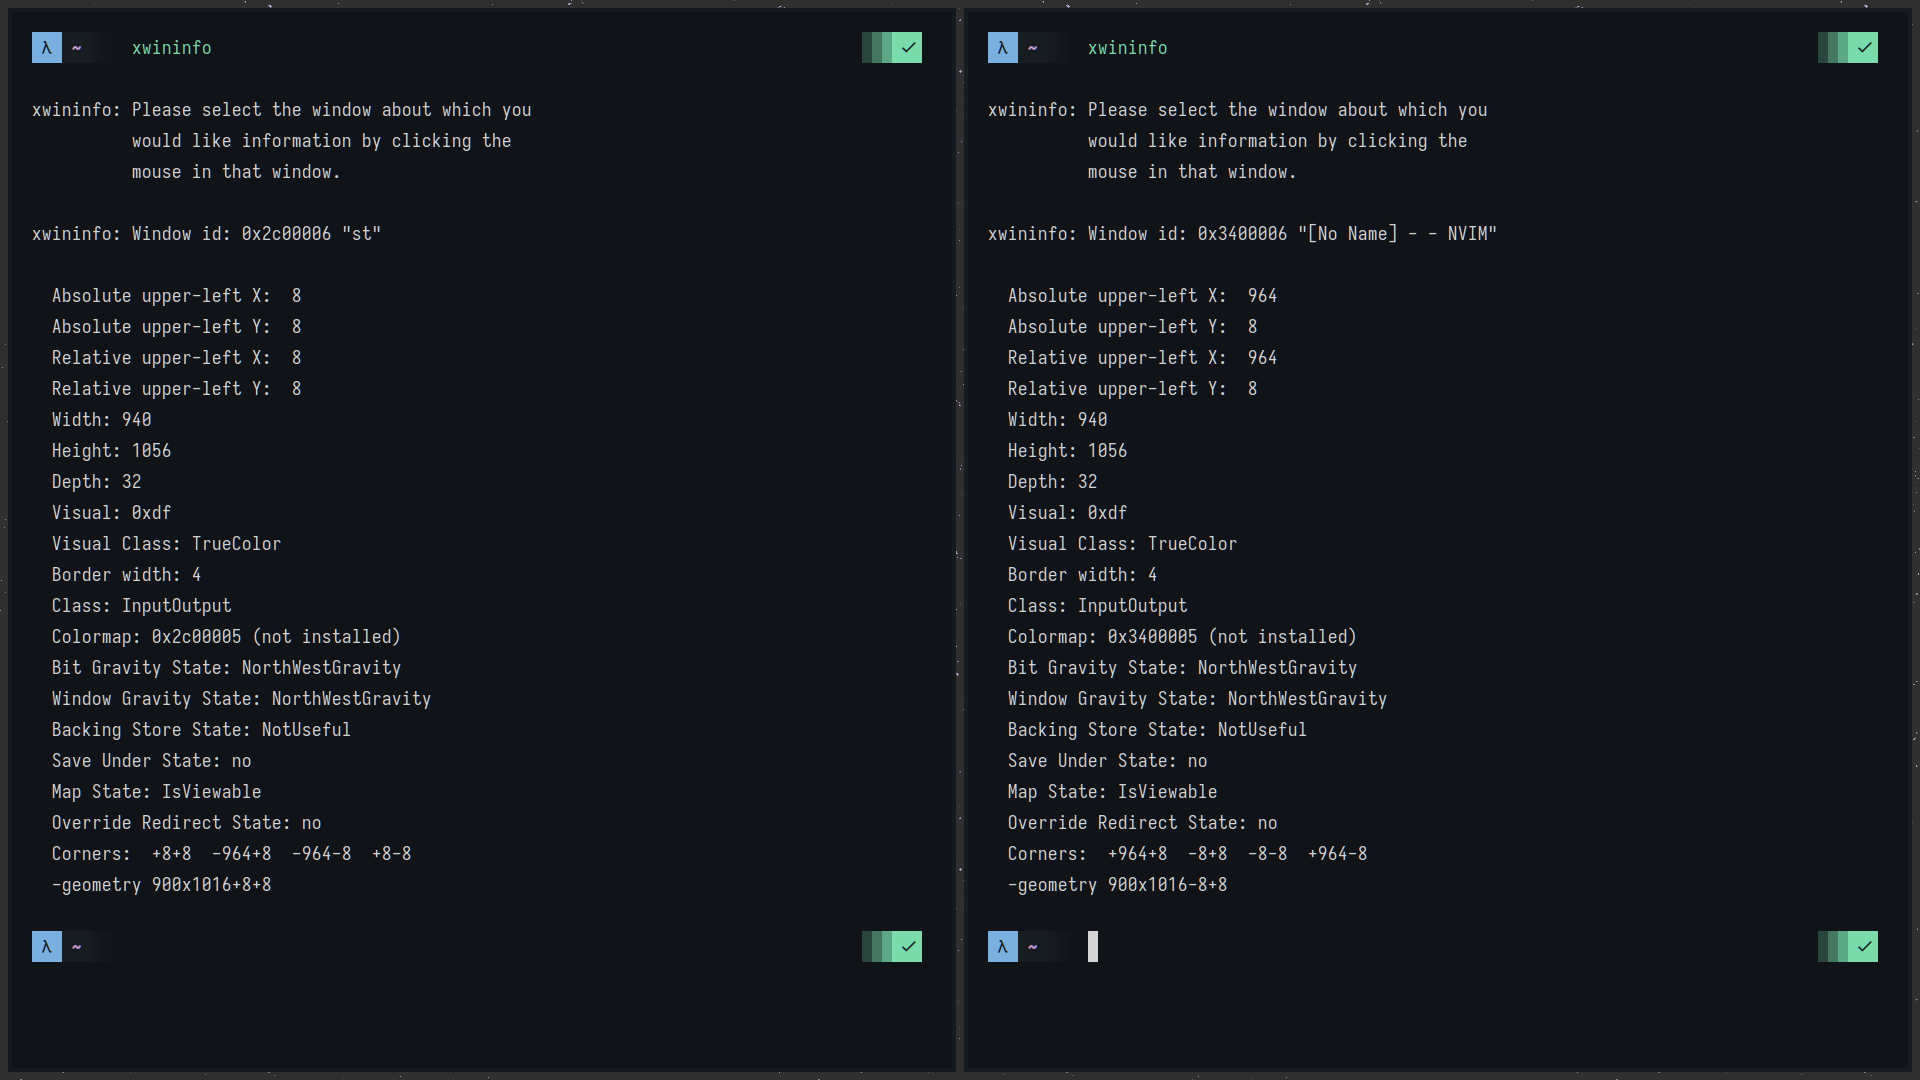
As the above image suggests, 0x3400006 and 0x2C00006 are the window IDs
of the left and right nodes. Now, we need to confirm if they both have
the same parent. Consider typing bspc query -N -n @parent in both of
the windows and see if they match. And, they will 😄.
| |
Opening another window with ID 0x3A00006, we will check if 0x2C00006
and the new window has different parents or not. Again type the
following commands.
Keep the third state diagram in mind.
Great! They are different. Now, we will navigate toward A through B.
For achieving this type the following.
Nice. B and 1 have the same parent. We have confirmed this.
Longest Side Scheme
This scheme is almost similar to that of alternate. The only difference is that it decides the fragmentation based off of the window geometry of the focused node.
The state diagram will be completely the same. However, the way that the window nodes are displayed will be different. As, the name implies, the node will be divided with respect to the side that is the largest. That might be its width or its height.
This is because BSPWM uses the split ratio to determine what the size
of the newly created window will be. So, by calculation if the split ratio
is 0.5, the first two windows will be of the exact same size i.e. 50%
of the desktop.
You can change this behavior by overriding the current split ratio value with the following command.
Now, the ratio is 0.35. Therefore, the size of left child will be
0.35 and right 1.00 - 0.35 = 0.65.
Yet again we will follow state diagrams. But, this time it will be somewhat different i.e. this time we will be using actual windows instead of nodes. This must be done because largest scheme is dependent on window geometries. So, it is better to illustrate using windows rather than using something abstract as nodes.
Initial State

The
blue
area is a newly spawned window which has been given focus. So, now when
we try to spawn another BSPWM will compare the width and height of the
current window i.e. width=1904 and height=1064. Comparing these
we see that the width is greater than the height.
Second State

Evidently, BSPWM decides to split the width by a 0.35 ratio. Let us
look at the newly spawned window (light blue) geometry. We can get the current
window geometry by using xwininfo and grep or, a use more compact
utility called slop. Following code has shows the xwininfo way,
slop way and lastly the bspc with jq way.
| |
Pay no mind to the small changes in the sizes, they are there because
of padding, borders and gaps. Moving forward, we see that the bigger
(from the previous state) window has
been reduced by 65% and now sits at 35% and the new window’s size is
now 65% and has been given focus. Again, comparing the dimensions we
see that yet again width=1235 is greater than height=1056.
Third State

Comparing again width=800 and height=1064 we see that this time
it is the height that is greater than the width.
Fourth State

Lastly, we see that the focused window from the previous state has been divided its height into two parts. Now, we can move further and show more steps but, that would be quite repetitive, and we won’t see any new changes. So, it is your task to predict what the next two steps will be by drawing its diagram and then match that diagram by opening that amount of windows.

Always, keep the following properties in mind.
- Split ratio
- Initial polarity
Lastly, you’d need to verify if the initial state window and the third state window have different parents then we need to verify if the grandparent of the third state and the parent of the first state are the same or, not. This check is same as the one in the alternate scheme.
Spiral Scheme
In this scheme the new window will be inserted at the current focused window’s insertion point. Effectively, it means that as long as the focus stays at the same position, the newly inserted window and the size of that window will stay the same.
For illustration, we will use tree-state diagrams this time as, this
scheme is both dependent on how the windows are arranged visually and
how the nodes are arranged internally. Also, we will be starting from
the second state as, the null and initial state is the same across all
schemes. Note that split_ratio will be set to 0.5 this time.
Second State


This is the second state of the spiral scheme. This step wasn’t really necessary but, paints a clearer picture of what comes after. Therefore, we shall predict what the next step will be. According to the introduction the newer node that will be spawned on the next state, will take the place of the focused node. Which the arrows point towards in the diagram.
Third State

So, currently we’re focused on the fourth node. And, now B is created at
1’s position (see previous state diagram)
and 1 has been moved to the second_child position of B and 2 has
been moved to the first_child position. Now, we need to verify this.
A way to get good at this is by following the state diagram as a map and as time passes this will become natural. Although, I doubt there is much use for this scheme.
Fourth State

You might notice a pattern in the tree structure i.e. it gets
attached to the right side (second_child) after the first level.
And, overall theory is that, the new node takes place of the current
focused node and then the focused node takes place of Nth node,
then Nth node takes place of (N-1)th node and when it reaches
the end a new parent node will be created say Z and node 2 and 1
will get attached to it.
An analogy for this would be a spiral staircase where the deeper you look down, the more illegible it gets and eventually fades into darkness.

Manual Mode
BSPWM also supports positioning and spawning a window at a custom direction.
For that the user needs to specify a region in the insertion point where the
next new window should appear by sending a node -p|--presel-dir DIRECTION message
to BSPWM. The DIR argument allows specifying how the insertion point should be
split (horizontally or, vertically) and if the new window should be the first or,
the second child of the new internal node (the insertion point will become its brother).
After doing so the insertion point goes into manual mode.
For starters, let’s configure preselect feedback visibility and the color of the preselect window.
In the following snippet, we will attempt to preselect a window at westward
direction and then adjust the preselect ratio and then open a
ranger file manager window on that preselected area.
The exact process may not match as I am using a keyboard daemon to launch
applications like ranger. So, if you see a file manager popping out of nowhere,
chances are it is a shortcut. If you want recommendations for keyboard
daemons then sxhkd and xbindkeys + xbindkeys_config-gtk2 are the best out there.
States, Flags And Layouts
BSPWM has implemented all the optional flags as mentioned in the ICCCM As, for the states there are four of them which can be customized and extended by using rules and event-subscribed shell scripts. Note that both states and flags are node specific i.e. they change how a node will behave. Layouts however, are desktop specific i.e. they change the way nodes are spawned in an entire desktop. States and flags can co-exist with layouts. BSPWM only has two layouts but, we will see further down the BSPC section how one can convert a node state into a desktop state by using event subscriptions. And, a way to create your own custom layouts.
States
In BSPWM a node can only have one state at a time. A node can only
have any one of these states floating, fullscreen, pseudo_tiled and tiled.
The tiled state is the default state when a node is spawned (which makes
sense why). Although, that can be overridden by events and rules. You may
use the following commands when setting a node state.
| |
What do these states mean?
Window state definitions and behaviors.
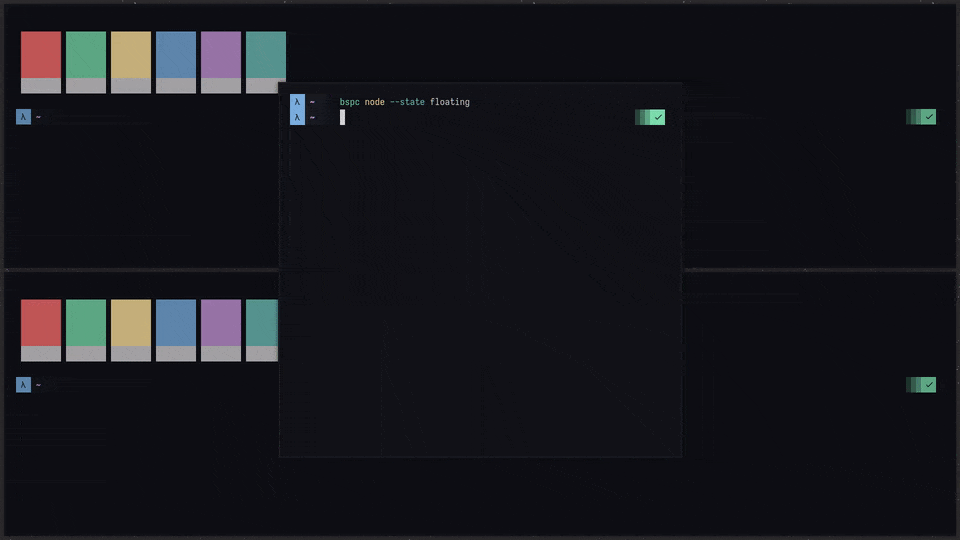
tiled: Its size and position are determined by the window tree.pseudo_tiled: A tiled window that automatically shrinks but doesn’t stretch beyond its floating size.floating: Can be moved/resized freely. Although it doesn’t use any tiling space, it is still part of the window tree.fullscreen: Fills its monitor rectangle and has no borders.
Following is a demonstration of a terminal window that undergoes several state changes.
You can create way more complex functionalities using a script and combining
the STDLIB of that scripting language or, a shell script with bspc
expressions, commands, etc.
Flags
As, opposed to node states, a node can have multiple flags at a time. As,
proposed in the EWMH, BSPWM defines all of such hints such as
_NET_WM_STATE_HIDDEN, _NET_WM_STATE_STICKY and others. And, on top of
those it also implements some extra flags as well. Anyway, BSPWM has six flags
namely, urgent, sticky, hidden, marked, private and locked.
These did not need to exist as we can re-create these ourselves. It is not specific to this WM. But, having a native way of integrating them certainly is nice. Moving on, the following commands are to be used when setting certain flag(s).
| |
Window flags and definitions.
hidden: Is hidden and doesn’t occupy any tiling space.sticky: Stays in the focused desktop of its monitor.private: Tries to keep the same tiling position/size.locked: Ignores thebspc node --closemessage.marked: Is marked (useful for deferred actions). A marked node becomes unmarked after being sent on a preselected node.multipleurgent: Has its urgency hint set. This flag is set externally.
Layouts
BSPWM has only two layouts by default. They are called tiled and monocle.
Obviously, there are ways to add more layouts by scripting them and by
creating receptacles. For starters, you can
change layouts by issuing the following commands.
You can get additional layout like master, rtall, grid, etc. From bsp-layout
by phenax. You can also try creating one yourself,
it’ll help you get a better understanding of BSPWM and perhaps BSTs in general
as well.
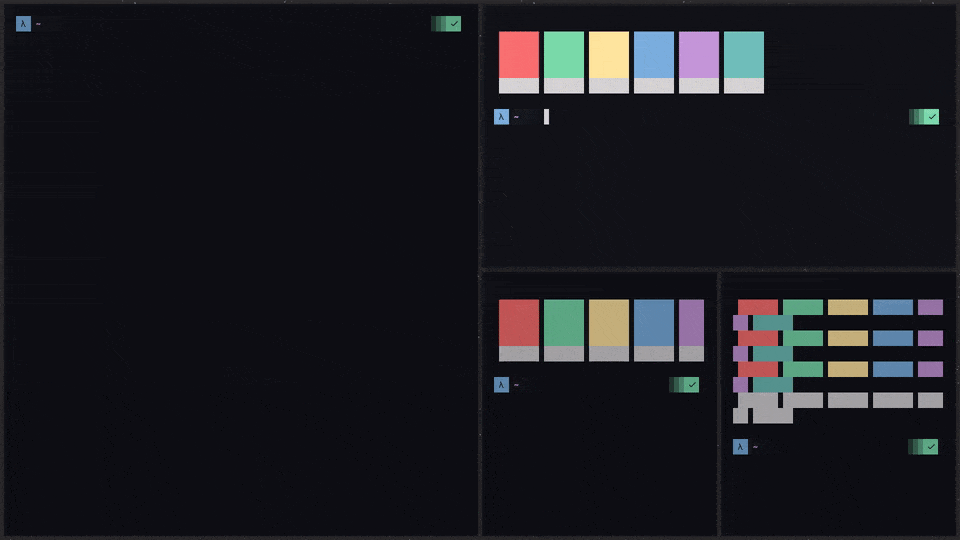
Following is a demonstration of monocle, tiled and bsp-layout layouts.
monocle: The default monocle layout provided by BSPWM.tall: A master-stack layout with nodes stacked vertically to the right of master.wide: A master-stack layout with nodes stacked horizontally below master.rtall: (Reverse tall) A master-stack layout with nodes stacked vertically to the left of master.rwide: (Reverse wide) A master-stack layout with nodes stacked horizontally above master.grid: A 2 row grid pattern (horizontal).rgrid: (Reverse grid) A 2 column grid pattern (vertical).even: Distributes all node areas in a desktop evenly.tiled: The default tiled layout provided by BSPWM.
Additionally, if you liked bsp-layout you might also like bsptab as well. It is
the BSPWM version of the DWM tab patch and the tabbed patch.
BSPC
As BSPWM defines it, bspc is an IPC client that controls the state of
BSPWM. It does so by sending messages through a UNIX socket and BSPWM
receiving them and acting on them accordingly. BSPC’s first flags serves
as a marker for what type of message it needs to send to BSPWM. They
are classified as follows.
config: Get or, set the value of a global setting.desktop: Get or, set the value of a desktop specific setting.monitor: Get or, set the value of a monitor specific setting.node: Get or, set the value of a window specific setting.query: Get metadata for an element state in BSPWM. Narrow down searches, get chunk of data, etc.quit: Safely exit BSPWM.rule: Adds predefined constraints to a window. Such constraints will change the way that particular window should be launched.subscribe: Subscribe to a BSPWM event. Examples could bedesktop_changeevent,node_focusevent,monitor_addevent, etc.wm: World state related settings.
Selectors And Symbols
Selectors are symbols that are used for narrowing down node, desktop and monitor
selections. They consist of an optional reference, a descriptor and any
number of non-conflicting modifiers [REFERENCE#]DESCRIPTOR(.MODIFIER)*. They
are used in conjunction with bspc calls for querying information about a
specific node or, multiple group of nodes. And, additionally they are also
used for changing behaviors of such targeted node(s) as well.
For example, to get all node IDs of all nodes that are hidden we need to
select all the nodes in all desktops and then out of that node group we need
to select only the nodes that have the hidden flag set.
The . is used to select a group or, a category. Similarly, the meaning would be
reversed if we decided to prepend a ! after the ..
Depending on what shell you use or, what shell configuration you have, you might need to escape the exclamation mark
\!. In the ZShell!means a literalSTDERR.
So, continuing further, the previous statement: “Get all node IDs of all nodes that
are hidden”, the reverse form would be: “Get all node IDs of all nodes that are
not hidden”.
Note that, the ! symbol cannot be used in canceling pre-selections. They use
the tilde ~ instead. So, effectively, after you have triggered the preselection
you can then cancel it by either passing the cancel argument explicitly or,
by prepending ~ before the same direction to cancel it.
| |
Moving forward. People often gloss over the fact that you can use increment + and
decrement - operators over node geometry commands to increase and decrease from
the current dimensions.
| |
You may also notice the usage of / and @ from the previous examples. They are
basically, node path selectors that are mainly used for navigating through the
node tree. Think of them as when you navigate through file trees using cd and
shell completions by using <TAB> and <SPACE> keys. In short, the @ denotes
the start of path navigation and / is used to get inside the nodes.
Next we have *, : and ^ symbols. You will see these being used
mostly in setting or, removing rules. The * symbol is used to select a
group of instance names, applying and removing rules on them.
: is used to select a subset of a class name which are called
instance names. For example, Firefox allows us to set instance-specific
rules at a window with the instance name Places.
Although, these are also used for path selections as well.
^ is used for selecting the Nth node, desktop and monitor. It acts as a serial
number. So, if desktop names consist of weird glyphs or, emojis then these
serials will keep us safe from ambiguity.
# has little to no use at all. It is a descriptor symbol.
It needs to exist after you have selected a reference that
consists of monitors, desktops and of course, nodes.
Rules
BSPWM allows custom settings for individual nodes. BSPWM calls it to window rules.
Besides the common stuff like adding, removing or, listing window rules we’re instead
going to discuss the --one-shot flag. Essentially, it allows a rule to take effect
only once. For example, there is a neat way of spawning terminal windows of a certain
geometry by selecting an area in the screen by holding down the mouse.

Other ways of setting rules.
Event Subscriptions
BSPWM allows the user to listen to BSPWM events continuously and provides
metadata related to those events. The user may continuously read those data
or, use the event type itself to operate on that event release.
BSPWM categorizes events into six types all, monitor, desktop, node, report
and pointer_action. Additionally, it allows a FIFO flags that you can
utilize as well.
For example, we can create a desktop where all nodes are floating.
1#!/usr/bin/env bash
2
3DESKTOP="$(bspc query -D -d \^$1)"
4bspc subscribe node_add | while read -r _ _ desktop _ node; do
5  # when a node spawns, change its state to floating
6  [ $desktop = $DESKTOP ] && bspc node $node --state floating
7done
This is a pretty ordinary way of using event subscriptions. You can also script
on_[monitor|node|desktop]_[add|remove] functionalities, callback on_geometry_change
can also be scripted, etc. For getting a feel for what event subscriptions are
capable of, we will be making a new layout in BSPWM called tall.
tall is the default master-stack layout where on one side, there is one
large window, called the master window and on another side, there are a stack
of windows called the slave windows. Hence, consider the following code.
 1#!/usr/bin/env bash
 2
 3# INFO: This is a bare-bones implementation of tall.
 4# WARN: Bugs are to be expected.
 5N=(bspc query -N @/2 -n)
 6
 7function calibrate() {
 8  bspc node "$("${N[@]}" .descendant_of.!window | tail -n1)" -y horizontal
 9  bspc node @/2 -B
10}
11
12while read; do
13  [ "$("${N[@]}" .descendant_of.window | wc -l)" -gt 1 ] && calibrate
14done < <(bspc subscribe node_add node_remove)
From the above code, we will be first subscribing to node_add and node_remove
BSPWM events. This is because, we need to resize all the slave nodes and make
them have the same heights when a new window is added AND when a window is removed
from the slave stack or, the master. The resizing is done by first turning the
orientation type of the newly spawned slave’s parent internal node to horizontal
as mentioned in line 6. And, then the unification is
performed on the slave stack itself as mentioned in line 7.
See the following demonstration for a better understanding.
tall.Receptacles
A leaf node that doesn’t hold any window is called a receptacle. When a node is inserted into a receptacle in automatic mode, it will replace the receptacle. A receptacle can be inserted on a node, preselected and killed. Receptacles can therefore be used to build a tree whose leaves are receptacles. Using the appropriate rules, one can then send windows on the leaves of this tree. In BSPWM one can insert a receptacle by issuing the following command.
To transplant (replace) a window node into a receptacle, you would issue the following commands.
World State
In BSPWM, a world state is the combined state of all BSPWM components such as monitor info, desktop info and node info all represented in the form of a JSON structure. It can be used to add logic and functionalities to that data. It can also be treated as a debugging mechanism.
You can narrow down the information you want by piping bspc wm -d through
jq and additionally, you may also use the following commands to narrow
down the info from the get-go.
But, on the user side, it is mostly used for saving and loading a WM state as a layout. Essentially, one saves a state to a file, then writes scripts to replace specific parts related to window nodes with receptacles. And, then formulate one-shot rules that will redirect a node to a particular parent when spawned.
In the following example, we will be using the tall.sh layout script from the
Event Subscriptions section and open
five windows and then record the state and save the STDOUT into state.json.
Then we will be using the extract_canvas Python script (included in the
examples
directory of the BSPWM repository) to replace the window nodes with
receptacles and then saving the STDOUT as a JSON file called load.json. Then
we will be using another script called induce_rules to create some rules out
of the nodes. Finally, we will be re-launching five windows again after loading
the state.json file.
| |
You can try swapping
St:sttargets with*:*and see the outcome.
If all goes well then, those st windows will open in tall layout without
that tall.sh script or, whatever.
References
- https://en.wikipedia.org/wiki/Binary_search_tree
- https://en.wikipedia.org/wiki/Linked_list
- https://man.archlinux.org/man/bspwm.1
- https://github.com/baskerville/bspwm
Tools
Ending Note
Phew! That was a lot. I did NOT know what I was getting into when I started writing this 😅. Although, hopefully this, won’t end here and next I might write another article on how to extend and customize BSPWM (that is still light years away). Additionally, Some sections did not make into this article as it was getting a bit too long like Motions, Extensions and History.
Lastly, I hope you have learned something new. Cheers 🍻.
If you find this journal helpful, please consider sponsoring.
Sponsor