EWW Powermenu
A classy powermenu using EWW.

Introduction
Hello there. Hope you are doing well. Lately, I have been playing with a neat piece of software called EWW. Making some aesthetic UI, widgets and whatnot.
Note that, this has a very steep learning curve. This is because tutorials, demo and examples about this are quite scarce. And the examples are either too complex or, very poorly documented and not to mention most of them are not even documented.
Prerequisites
Some requirements about what you’d need to get started like what OS will this work on, what languages you’d need to know, etc.
Familiarity with Linux is required. This is for Linux users only.
I will be using Archlinux for this. Debian users may need to translate some commands. But, for the most part equivalent commands will be provided.
A bit of programming experience will be preferred.
A xorg based window manager. Like bspwm, qtile, xmonad, etc. A display environment will work as well.
Does EWW work on Wayland?This tutorial is designed for running EWW on a xorg-based window manager, but minimal changes should be able to make it run on wayland. See build flags and widget definitions.
Dependencies
Packages that are needed for this to work correctly.
- First and foremost you will need EWW. Head over to their website and follow their instructions.
- And you would also need
sudowhich you already might have installed. - Fonts used in this widget are Poiret One, Koulen and Phosphor.
nmclitool that comes with Network Manager which you already might have installed.
Copy and Paste
 1
 2
 3
 4
 5
 6
 7
 8
 9
10
## Debian
curl --proto '=https' --tlsv1.2 -sSf https://sh.rustup.rs | sh
git clone --depth 1 https://github.com/elkowar/eww.git
cd eww
# then install the *-devel variants of your distro
# SEE: https://elkowar.github.io/eww/#prerequisites

## Archlinux: Using an AUR helper like yay is advised.
## SEE: https://wiki.archlinux.org/title/AUR_helpers.
yay --sync eww-git # yay -S networkmanager --needed
That is all really.
Setup
Getting things ready before we begin.
- For starters, you will need to create a folder at
~/.config/eww. - Then a few files at
~/.config/eww/eww.scssand~/.config/eww/eww.yuck. - A wallpaper. I’ll be use this one from wallhaven
which was converted to OneDark using ign.
Rename the file as
wallpaper(yes, remove the extension as well) and then put it in~/.config/eww.
All preparations are now complete. Now, we can start (Finally! 😃).
Syntax
Introduction to yuck syntax, SCSS syntax and some handy shell commands.
Yuck Syntax
The above heading may be confusing for new users, but it is legitimate.
The configuration file is literally called eww.yuck (pun intended).
“EWW” is configured using its own language called yuck. Using yuck, you declare the structure and content of your widgets, the geometry, position, and behavior of any windows, as well as any state and data that will be used in your widgets. “Yuck” is based around S-expressions, which you may know from lisp-like languages.
Yuck is a lisp-based language (which is based) that uses parentheses quite excessively as you will see in the subsequent sections. It can be hard to read at first. But as most things you will adapt.
It is recommended to install DSL plugins like yuck.vim for Vim users or, yuck-vscode if you use VSCode for syntax highlighting.
For Vim users you might want to use vim-parinfer for auto-indentation. Note that, the author of yuck.vim has already implemented auto-indentation to a specific degree.
Lastly, since I am a Neovim user therefore, I am obligated to say this; You might want to use nvim-parinfer by gpanders instead of the Vim version as this one is written in pure Lua and is generally faster than VimL, albeit a bit underdeveloped.
Defining A Window
A window is a box that stores things. In this case the “things” are known as
widgets (and no, windows are not widgets). EWW states that a window can only
house one widget. Now, a said widget may be a box which has the ability to
house multiple widgets, e.g. a label which will display a text as later
explained in the Widgets That We Will Need
section.
For now, take a look at the following yuck snippet.
This is a window definition in yuck syntax. Take a guess of what each of the properties mean and crosscheck them from the following table.
| Property | Description |
|---|---|
| width | Width of the window. Values may be provided in px or %. |
| height | Height of the window. Values may be provided in px or %. |
| stacking | Where the window should appear in the stack. Possible values: fg, bg. |
| wm-ignore | Whether the window manager should ignore this window. This is useful for dashboard-style widgets that don’t need to interact with other windows at all. Note that this makes some of the other properties not have any effect. Either true or false. |
| windowtype | Specify what type of window this is. This will be used by your window manager to determine how it should handle your window. Possible values: normal, dock, toolbar, dialog, desktop. Default: dock if reserve is specified, normal otherwise. |
% for widths and heights.Learn more about properties from the docs.
The powermenu_layout part is a custom widget.
Defining A Widget
Take a look at the following snippet.
This is a widget that will display the string “Hello, World!” once it has been hooked into a window as you have seen above.
Additionally, you can also specify widget properties in a window definition.
| |
However, I would advise you against that since it would look congested and illegible.
Widgets That We Will Need
EWW has a plethora of built-in widgets that you can use for your own custom widget. Out of those we will only need a few for this project, which are pretty basic.
The
labelwidget. It has the ability to print non-interactive text on the screen. But, it shines the most when used in conjunction with buttons, boxes, eventboxes (i.e. when nested within other widgets).1(label :text "Hello")Labels can also be implicitly defined.
The
buttonwidget. It just executes a command on left, right and middle clicks.The
boxwidget. It allows nesting widgets.1 2 3 4 5 6 7 8 9 10 11 12 13 14 15 16 17;; :orientation "v" means the same (box :orientation "vertical" :class "bx" (label :text "This is a label.") (button :class "btn" (label :text "This is a label nested inside of a button.")) "This is also a label." ;; no orientation means horizontal (box :class "nst-bx" ;; NOTE: You have to write more when you use an explicit label. ;; So, in this case, I would follow a discipline to only ;; use it when I need to apply another option to it like, ;; limit-width. (label :text "Hello" :limit-width 4) (button :onclick "notify-send Left" :onmiddleclick "notify-send Middle" "Hello")))Note, vertical orientation will place the widgets in a top to bottom flow and horizontal, left to right.
Exercise: Try to build a widget that will show “Hi there.” and will consume the left half of the screen.
Learn more about other widgets and their properties from the docs.
Defining Variables And Dynamic Data
Take a look at Showcase section. Notice that there are Network, Time and Battery information. Those are not interactive widgets but they are dynamic. Rather, they display dynamic data. Like, let’s take the Time label in the bottom-left corner. This label will display the new time value whenever the time changes.
So, if the time becomes 12:00 to 12:01, the label will reflect that.
This is NOT automatic. You need to configure this behavior by using a poll
variable, that will run the date command at a specific interval and capture
the STDOUT.
Hence, consider the following.
Here, the command date +'{"hour":"%H","min":"%M"}' will be executed with
an interval of 5 seconds which will return {"hour":"11","min":"30"} for example.
date call is known as JSON.
date +'%H:%M' could be used instead but, know that a JSON string can also be used.Now, you just need to bind this to a widget label.
There are other kinds of variables as well which you can learn about from the docs.
Magic Variables
Convenient built-in variables that are added so that you do not have to do it yourself.
We’ll only need EWW_BATTERY
for this one.
There are numerous magic variables which you will find in the docs.
SCSS Syntax
EWW widgets are styled using SCSS which compiles to CSS. Since it is a well known language I won’t be teaching you SCSS/CSS; quite frankly, there are numerous sites and videos that will explain this better.
Here are a few links. Keep in mind that you just need to learn CSS and then gloss over them to get the differences between CSS and SCSS.
- Official Documentation — sass-lang.com
- Beginner’s Guide to Using SCSS — code-boost.com
- The definitive guide to SCSS — logrocket.com
You may want to learn CSS first if you do not know it. Learn CSS in 20 Minutes video by Web Dev Simplified seems like a great place to start.
- This is also nice to have GTK3 CSS Overview.
I hate to do this to you but, most of the things that SCSS provides
(like the use
keyword) aren’t supported in the EWW SCSS.
This may seem overwhelming… because you might be thinking of digesting all the above links. This is wrong. Just get a general idea of CSS and use the links as mere references. Use them as Google. Refer to the documentation, tutorials and videos only if you are stuck or, want to implement something new. Do not treat them as textbooks.
Writing The Powermenu
Finally, we can actually write the Powermenu. Moving on… This section will be divided into five subsections. Namely:
- Window Definition
- Variable Definitions
- Module Definitions
- Layouts and Positioning
- Styling with SCSS
Let’s begin.
Window Definition
We will define a window that will fill up the entire screen. Hence, the width
and height options in the window definition needs to be 100%.
See the running section to view the EWW window.
(powermenu_layout) with “Testing…”
or, whatever to run this without any errors.Variable Definitions
As mentioned before, we need:
Battery capacity value which can be fetched using the
EWW_BATTERYvariable. Find out the key value of your battery interface which can be found fromls /sys/class/power_supplyprefixed withBAT. Now, take a note ofEWW_BATTERY.BAT0.capacityandEWW_BATTERY.BAT0.status(this is for me. Yours might beBAT1,BAT2, etc.). We will need these later.For the network connectivity and strength, we can just use the following.
For getting the current time we will use this
date +'{"hour":"%H","min":"%M"}'.
Now, incorporate these into yuck-variables.
Module Definitions
Dividing complex layouting into modules is not important at all. But, it will be useful if something decides to break or, if you want to add/remove widget(s).
This section is divided into five specific sub-sections.
- General Widget Options
- Buttons Module
- Battery Module
- Network Module
- Sundial Module
General Widget Options
These options or, properties can be applied to built-in widgets only. Like
box, transform, scroll, label, etc.
class:stringCSS class name.valign:stringhow to align this vertically. Possible values:"fill","baseline","center","start","end".halign:stringhow to align this horizontally. Possible values:"fill","baseline","center","start","end".vexpand:boolshould this container expand vertically. Default:false.hexpand:boolshould this widget expand horizontally. Default:false.width:intwidth of this element. Note that this can not restrict the size if the contents stretch it.height:intheight of this element. Note that this can not restrict the size if the contents stretch it.active:boolIf this widget can be interacted with.tooltip:stringtooltip text (on hover).visible:boolvisibility of the widget.style:stringinline CSS style applied to the widget.
How Do These Work?
Brief descriptions on how these options will affect your widgets.
Only valign, vexpand, halign and hexpand will be explained.
Rest are pretty intuitive.
Parse the following diagrams.

When halign=end and hexpand=true
Setting the value of halign to end will result in the children widgets being pushed to the left, which in this case is the label.

When hexpand=false
Setting this to false will result in the box being the same size as that of the label. Additionally, it will stretch out with increasing content.

When both widgets have hexpand=true
Evidently, the result will be a tug o’ war between the labels and then one with the larger content length will win! Same length will result in a stalemate.
Buttons
This module will display the interactive control buttons at the bottom of the window. Like a shutdown button, a reboot button, etc.
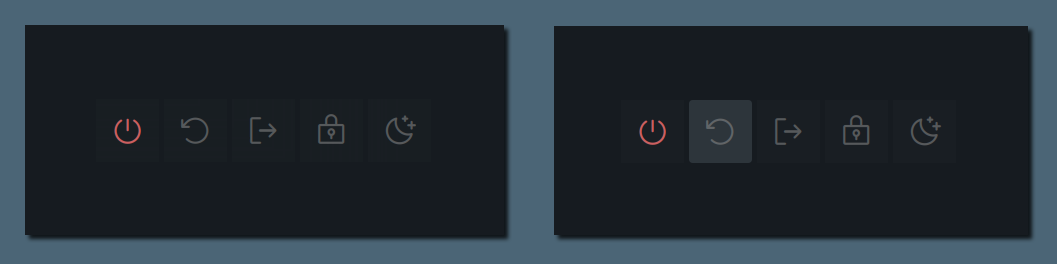
Now, consider the following yuck-snippet for this module. Treat the properties shutdown,
shutdown_icon, logout_icon as functional parameters.
| |
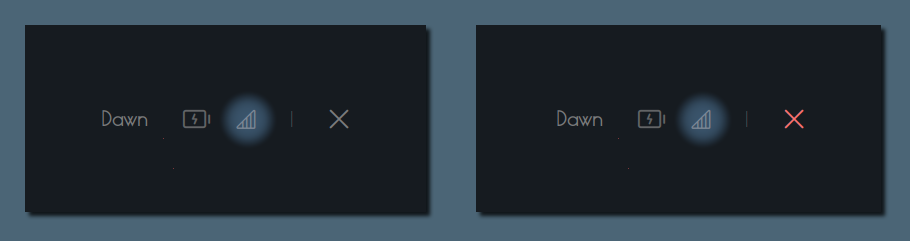
Network
We will classify network strength into four levels — excellent, good, okay, slow and offline. This will be done using ternary operators. To illustrate this better following is a comparison between ternary operators and normal conditionals in C.
Finally, consider the following snippet.
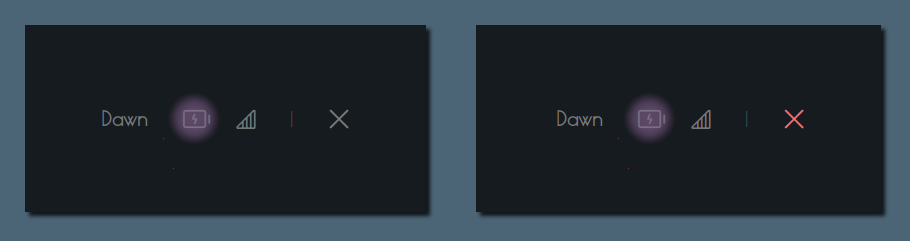
Battery
Battery current capacity is classified into eight levels. Namely, one,
two, three, four, five, six, seven and charge.
Hence, take a look at the following code snippet.
| |
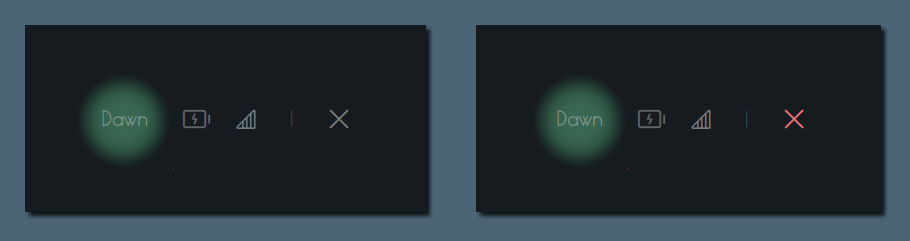
Sundial
This should be the easiest of them all 💀. Jokes aside, this part needs to be refactored. But, you should get the general idea regardless. This module just displays the current time-of-the-day value. For instance, the time between 17:00 and 17:59 (incl.) will be deemed as “Late Afternoon”.
Finally, consider the following snippet (no matter how bad it is). Just get an idea of what it does 💀.
| |
Layouts and Positioning
Now, we will glue all the modules and bare widgets into a single widget
called powermenu_layout.
| |
Styling with SCSS
I won’t be explaining this. Just refer to the Sass docs.
| |
:class "name" will correspond to .name { color: pink; } in SCSS.Full Code
Here is the full code.
| |
| |
Running The Powermenu
Moment of truth. Run the widget by executing the following command.
| |
And that is all really. If the widget looks like the following image then congratulations, you have made it.

There are many neat eww flags that might interest you. Try eww --help
for starters. If anything ‘does not work’ then try looking at the
debugging section. The
debugging section might also help you
in solving general problems related to EWW.
Debugging
Following are some of the things that you should do before anything else if the widget seems buggy or, not reflecting the changes that you’ve made.
Always check the logs
eww logs. Try the updating + saving combo i.e., change a part of code then write those changes, and you will see real-time updates in the logs.You can check the state of what variables are active in currently or, if a variable is even yielding any results or not by using
eww state. For the Powermenu the output might look like the following.This will work only if widgets i.e. if Powermenu is open. If any widgets are open then it will show the state of the variables being used by that.
You can also use
eww get <variable_name>likeeww get timefor selectively verifying the value of a variable and if it yields correct output or, not. This also will print values only if the widget window is open.A hot reload is always a good option. Trigger it by using
eww reload.See if the EWW daemon is running by using
eww pingand if the output ispongthen it is responsive.List of windows available and opened can be seen by using
eww windows.Where
discloseis opened and rest are closed.If you notice that there are predefined colors, paddings, margins, etc. Then adding this
* { all: unset }at the top of your SCSS file will disable that. This should be done to disable the theming configurations that come with your existing GTK theme.GTK Inspector is probably the most useful tool for debugging not just EWW widgets but, GTK widgets in general. If you are stuck or, do not know what component you want to style then open the inspector by
eww inspectorand then select the component by clicking on pointer button then drop the pointer arrow onto any part the EWW widget window.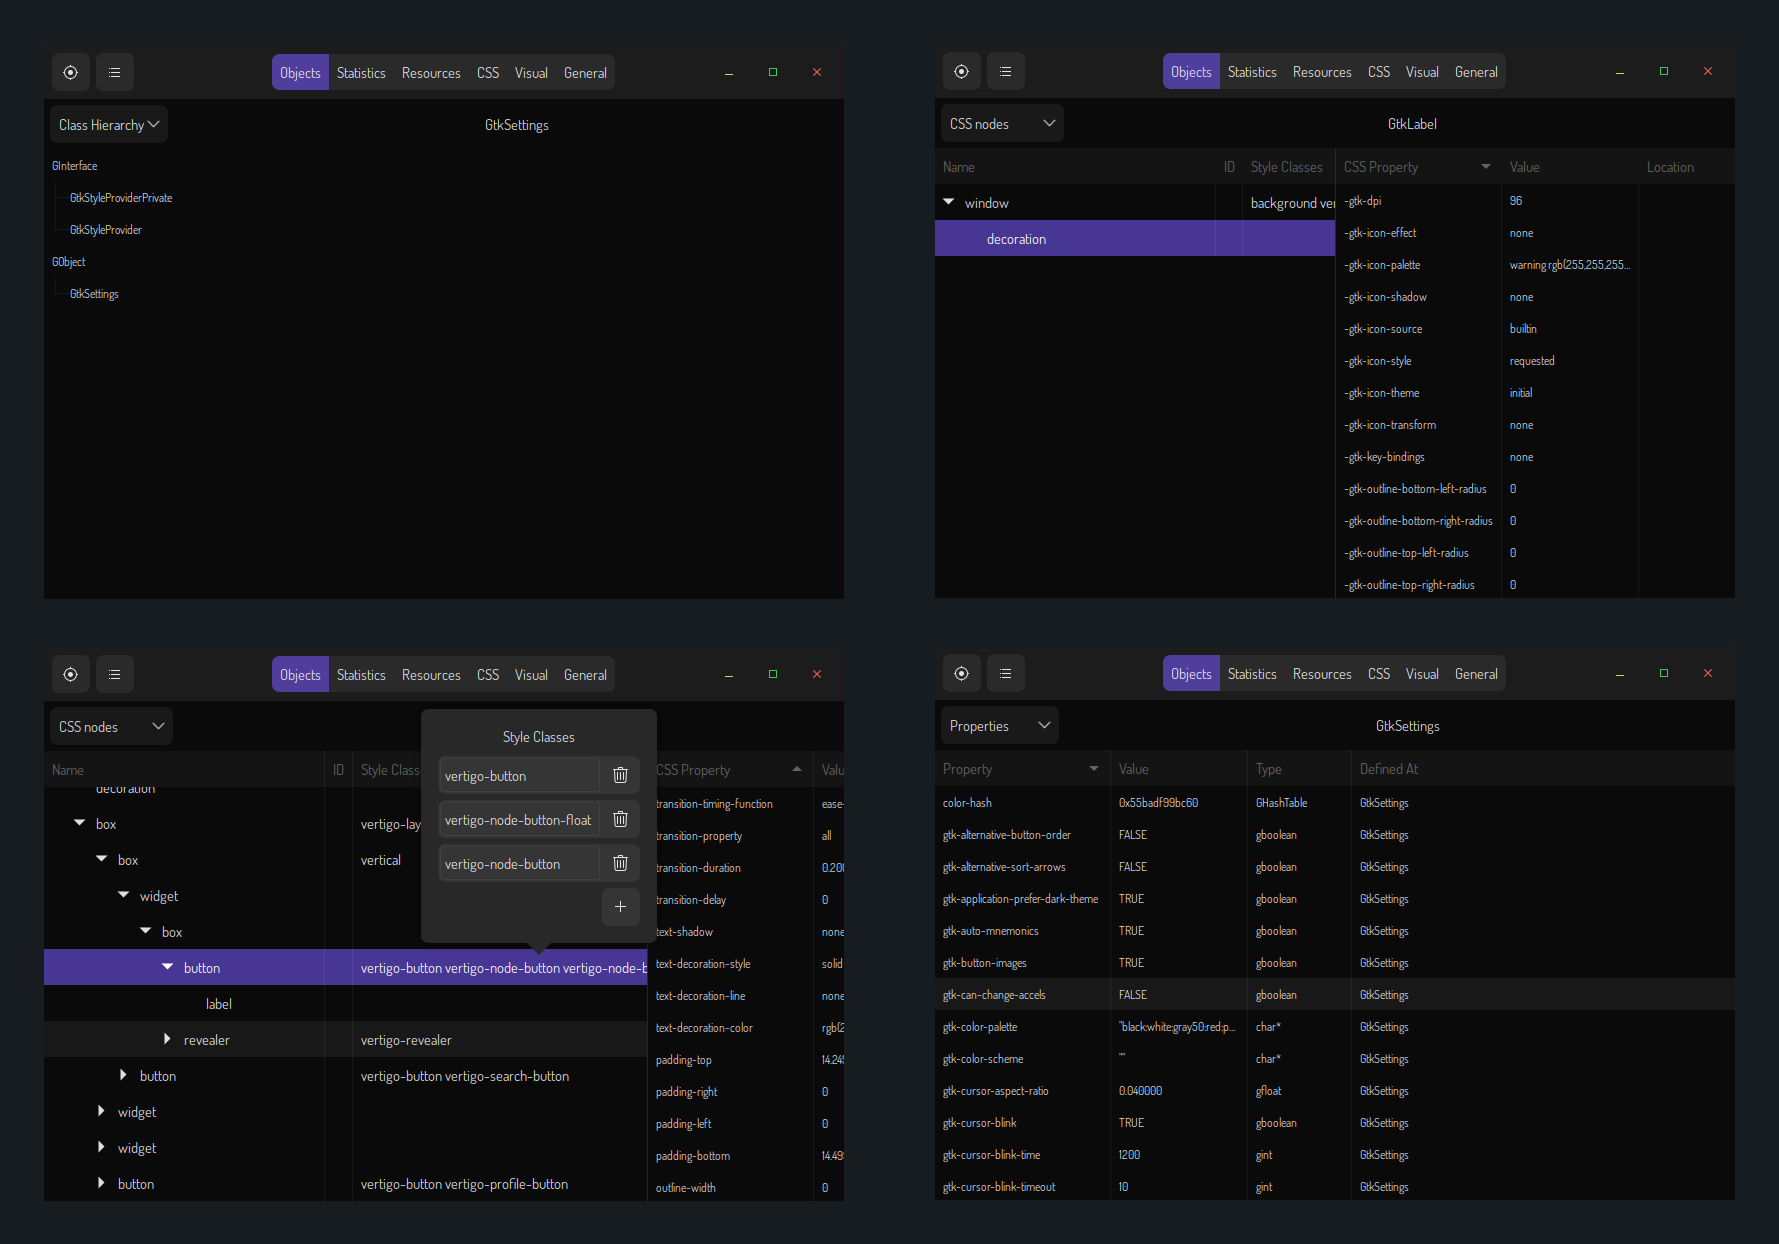
If these still did not solve your problem then make an issue regarding it or, ask in the discussions tab.
Tips
If you are having difficulties implementing your own widget(s) then it might be a great idea to look at how other people implement that and adapt + incorporate that into your configuration. A great place to look for those would be eugh, eww-bar and my gists.
Commenting your code is always a good idea as, it will serve as a guide if you have forgotten what a specific part of code does.
I initially planned to do this but, decided not to as it would be too much. Anyhow, the idea is to separate and segregate specific part of your yuck and SCSS code into separate files. Like putting
powermenu_layoutand all the modules in different files. Or, just put every module in separate files. You may use(include "./path/to/file.yuck")for importing yuck files and@import "./path/to/file.scss"for importing SCSS files.It is also a good idea to separate
*.yuck,*.scssand script files into separate folders (Ahem! Directories. Pardon my French).Additionally there are sub-options in
ewwas well. Note that, this is not specified explicitly in the docs.
Showcase
Behold! Feast your eyes! 🤩


Projects That Use EWW
- eww-widgets by Saimoomedits
- dotfiles by Battlesquid
- eww-bar by elkowar
- gross by iSparsh
- hotfiles by Syndrizzle
- dotfiles by janleigh
- vile by dharmx
- dotfiles-v2 by AlphaTechnolog
- dotfiles by siduck
- bspdots by rxyhn
- widgets by adi1090x
Resouces
- The EWW documentation website.
- My fairly large collection of EWW widgets. by dharmx
- Simple examples of various builtin widgets by druskus20
- Example by elkowar
- Examples of some EWW widgets in action (Old) by iSparsh
- Neat, clever and original EWW widgets by Vermoot
References
- https://elkowar.github.io/eww
- https://github.com/elkowar/eww
- https://github.com/dharmx/vile/tree/main/src/yuck/power
- https://github.com/dharmx/vile/tree/main/src/scss/power
- https://github.com/Vermoot/dotfiles
Ending Note
Let me know if you have any article requests involving EWW. And, I hope you enjoyed building this. Cheers 🍻.
If you find this journal helpful, please consider sponsoring.
Sponsor